Growing Potatoes In East Bay Gardens: 6 Varieties For Spring Planting
As the East Bay Area's cool late winter and early spring weather arrives, soil conditions become suitable for potato planting.
Potatoes are one of the most rewarding edible crops you can grow at home. They thrive in raised beds, backyard garden rows, and even large containers on patios.
This year at Evergreen Nursery, we’re featuring six excellent certified seed potato varieties: California White, Dark Red Norland, French Fingerling, German Butterball, Huckleberry Gold, and Russet Burbank.
Here are the best practices for planting, growing, and harvesting potatoes successfully in home gardens across San Leandro, Oakland, Castro Valley, Alameda, San Lorenzo, and Hayward.
Why Plant Seed Potatoes in the East Bay in Late Winter–Early Spring?
In the San Francisco East Bay, the ideal planting window for potatoes is late winter through early spring (February–April).
Potatoes grow best in cooler temperatures, and planting early gives these tubers time to develop before summer heat arrives. Gardeners typically get better yields and flavor when potatoes mature during mild spring conditions rather than in the hot weather months.
Choose the Right Soil and Site
Soil Basics
- Potatoes need loose, well-drained soil to form smooth, healthy tubers.
- Potatoes prefer slightly acidic soil, around pH 6.0–6.5.
- Sandy loam or clay soil amended with a planting mix works best.
- Mix in plenty of organic compost or aged organic matter before planting.
- Avoid compacted soil, which leads to misshapen or undersized potatoes.
Sun & Space
Choose a sunny planting area with at least 6 hours of direct sun daily. Avoid spots that stay soggy after rain, since poor drainage increases the risk of tuber rot and disease.
Planting Seed Potatoes: Spacing, Depth & Hilling
Certified Seed Potatoes Matter: Always plant certified seed potatoes, not grocery store potatoes. Certified seed is grown specifically for planting and helps reduce the risk of disease in your garden.
How to Plant in Garden Beds
- Cut large seed potatoes into chunks with at least one or two “eyes”.
- Let cut pieces cure for 1–3 days before planting.
- Plant pieces 3–4 inches deep.
- Space potatoes 10–12 inches apart in rows about 2–3 feet apart.
How to Plant in Containers
- Potatoes grow very well in 20–25 gallon containers, fabric grow bags, or large bins with drainage.
- Start with 4–6 inches of soil, plant seed pieces, then add more soil gradually as plants grow.
Hilling for Bigger Harvests
When plants reach about 6 inches tall, mound soil or mulch around the stems. This is called hilling, and it:
- Encourages more tuber production.
- Prevents potatoes from turning green in sunlight.
- Improves yields in both beds and containers.
- Repeat hilling once or twice during the season.
Watering, Fertilizer & Mulch
Watering Tips for East Bay Spring Weather
- Potatoes need consistent moisture, especially as tubers begin forming.
- Aim for about 1–2 inches of water per week.
- Use drip irrigation or soaker hoses when possible.
- Avoid overhead watering, which increases fungal disease risk.
- Reduce watering once foliage begins yellowing near harvest.
Fertilizer Needs for Healthy Tubers
- Potatoes benefit from balanced nutrition but too much nitrogen leads to leafy growth instead of tubers.
- Amend soil with organic compost before planting.
- Use an organic vegetable fertilizer with moderate nitrogen and higher phosphorus/potassium.
- Side-dress lightly mid-season if growth slows.
Mulching Benefits
Mulch your potato mounds or growing containers with straw or shredded leaves to:
- Retain soil moisture
- Suppress weeds
- Keep tubers cooler as temperatures rise
Pest & Disease Management (Organic-Friendly)
East Bay gardeners often want to grow food crops without harsh chemicals. These strategies help prevent common potato problems naturally.
Crop Rotation and Prevention
- Rotate crops yearly (don’t plant potatoes in the same bed repeatedly).
- Keep foliage dry to reduce blight risk.
- Harvest promptly and remove plant debris at season’s end.
Low-Toxicity Pest Controls
- Use row cover early in the season to block beetles and pests.
- Hand-remove pests when possible.
- Apply insecticidal soap or neem only if infestations become severe.
- Companion planting with flowers and herbs can attract beneficial insects to help control pest populations.
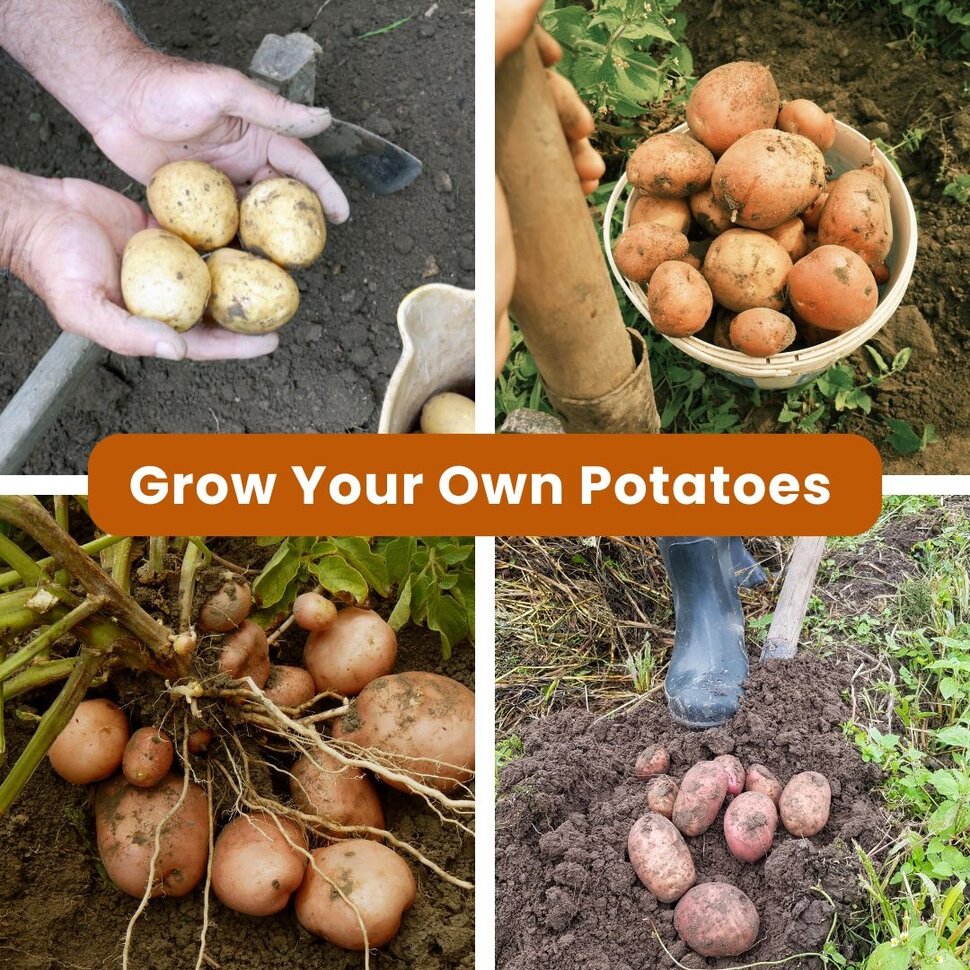
Harvesting & Storage
When to Harvest Potatoes
- Most potatoes are ready 90–120 days after planting.
- For baby potatoes, harvest shortly after flowering.
- For mature storage potatoes, wait until foliage yellows and dies back.
Curing and Storing Your Crop After Harvest
- Cure potatoes in a cool, dark, ventilated space for 1–2 weeks
- Store in a dark pantry or garage area away from sunlight
- Do not refrigerate, as cold temperatures affect flavor
Spotlight on Our 6 Seed Potato Varieties
California White: A smooth, classic all-purpose white potato for boiling, roasting, or mashing.
Dark Red Norland: An early red potato perfect for potato salads and harvesting young.
French Fingerling: A gourmet fingerling with buttery texture and excellent roasting flavor.
German Butterball: Rich, creamy, and a favorite for gardeners who love classic potato taste.
Huckleberry Gold: Beautiful purple skin with golden flesh and strong performance in cool spring weather.
Russet Burbank: The classic baking potato with excellent yields and long storage potential.
In Closing
Growing potatoes at home is one of the most satisfying spring gardening projects, whether you’re planting a raised bed or a patio grow bag. Visit us at Evergreen Nursery in San Leandro to shop our certified seed potatoes, bulk compost, bagged planting mixes, and get friendly local advice for a successful East Bay harvest.
Recent articles
View all
Native Plant Extravaganza Featuring Homegrown Habitats San Leandro
Monarchs and Milkweed in Your San Leandro Garden